Programming

Did a user click a button?

While working on a project I came across a situation where I needed to know if a button was clicked by a user or if it had been triggered by the code.

Lucky for us, the DOM is pretty friendly to us in this instance and offers us some help - the isTrusted property from the Event interface.

Let’s create a simple Ionic app and add in some HTML and Typescript to try it out.

<ion-content>
  <ion-item text-center>
    <ion-label class="ion-text-center">{{ source }}</ion-label>
  </ion-item>

  <br />

  <ion-button id="button" expand="block">
    User click click
  </ion-button>

  <ion-button (click)="onRobotClick()" expand="block">
    Robot click
  </ion-button>
</ion-content>

We have a simple label which will hold the source of our clicks and two buttons.

Let’s now add some typescript code to handle all the different clicks.

export class HomePage implements OnInit {
  source: string;
  constructor() {}
  
  ngOnInit(): void {
    document
      .getElementById('button')
      .addEventListener('click', (event: Event) => {
        this.setSource(event.isTrusted)
      })
  }

  onRobotClick() {
    document.getElementById('button').click();
  }

  setSource(isTrusted: boolean) {
    this.source = isTrusted ? 'User' : 'Robot'
  }
}

We will add an eventListener on our first button and then monitor what happens with him.

Clicking the button itself will trigger a regular event which we will handle with the event listener and check for the isTrusted property which should be set to true.

If we click the second button we will executed a different function which will grab the element by its id and execute a click which should result in the isTrusted being set to false.

In both cases we will call the setSource function which will get the property and display if a user or robot clicked on the button.

click-gif.gif

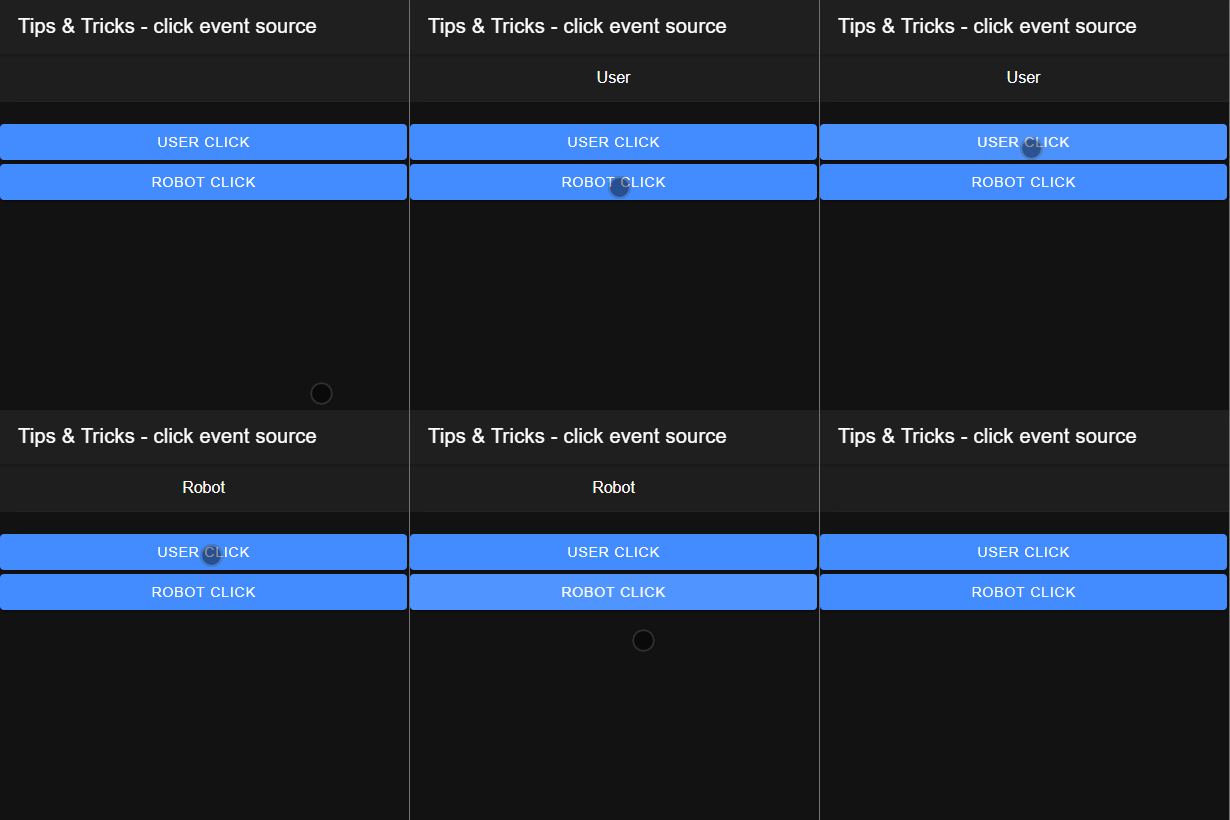
As you can see above, clicking the button directly results in the isTrusted property being true so the app displays, correctly, that a user clicked on the button. Clicking the other button triggers a programmatical click on the HTML element which results in the property being false which is indicated by the label changing to Robot.

As always, you can get the code from github.

That’s it for today.

Until next time,
Happy coding

Regex in a switch statement

While working for a client I recently came across an interesting problem. The routing architecture was designed in a particular way which prevented users from directly accessing a page by using a specific URL to the resource. Users had to click their way through the app to get to a specific user or location.

A square peg and a round hole

This proved to be a challenge when a new requirement came up to allow administrators to send links to managers for individual locations.

The links were in the form of http://foo.bar/location/[locationId]/manage

We were able to generate these links directly but the infrastructure to navigate to them didn’t exist and since the entire code base is going to be rewritten with only the necessary modules first, there wasn’t really an incentive to redo the entire routing architecture.

Trying to square the round hole

The approach taken was to create an http interceptor for the app and only trigger the direct navigation mechanism for very specific URLs.

The first draft of the app had a bunch of if statements which would perform Regex evaluations for each of the specified URLs and return a result only on matches. It worked well enough to fix the problem but we didn’t really liked the way it looked. It looked a little clumsy so we tried cleaning it up a bit and ended with a nicer solution.

The solution

Instead of using if statements we wrapped everything up in a switch statement.

getRedirectPage(part: string) {
   switch (true){
       case /location\/\d+\/manage/.test(part): 
           return 'LocationManagePage';
       case /user\/\d+\/profile/.test(part): 
           return 'UserProfilePage';
       default:
           return '';            
   }
}

The return value of the .test() function is of type boolean and only one of the expressions will (or should) return true and match the control value passed to the switch statement which in turn executes a specific block of code which returns the correct page to navigate to.

More often than not, this will be just syntactic sugar, even though switch statements can be more optimized than if statements (link), in our case the performance will pretty much be identical.

Next time we will look into one big performance issue in Angular and Ionic applications - having function calls inside the HTML template and discuss some solutions to this problem.

Until then,
Happy coding

Creating reusable components

Just as the coronavirus outbreak taught us to isolate ourselves for our own benefit as well as for the benefit of everyone around us, isolating parts of your code can give you a lot of benefits:

  • smaller code

  • bugs only in one place

  • no code duplication

  • better code structure

Creating a component and (re)using is very simple.

In this tutorial, we will create a component that will mock publishing the current page to social media.

Creating the app

Let’s create a new Ionic Capacitor app and add a folder named components inside the app folder.

> ionic start components blank

Once you are done with adding the folder your project structure will look like this

...
 src
   app
     components
...

Let’s now create a component using by using the Ionic CLI

Generating the component

> ionic generate component components/social-share

This will create all the needed files (.html, .scss, and .ts) and we are ready to add functionality to our component!

// social-share.component.html

<ion-button (click)="onShareClick()">
  <ion-icon 
    slot="icon-only" 
    name="share-social-outline">
  </ion-icon>
</ion-button>

// social-share.component.ts

import { Component, Input } from '@angular/core';

@Component({
  selector: 'app-social-share',
  templateUrl: './social-share.component.html',
  styleUrls: ['./social-share.component.scss'],
})
export class SocialShareComponent {
  @Input() currentPage: string;

  constructor() { }

  onShareClick() {
    alert(`Sharing ${this.currentPage} to the world!`);
  }
}

Now that we have a basic component that uses the @Input() currentPage to know from where it has been called there are just two more things to be done.

Creating a components module

In order to use the component, it has to be declared inside one (and only one) module. If you plan to use a component just on a single page it makes sense to declare it inside that page’s module. However, we expect this component to be used across the app so we will create a components module from which then other parts of our application can use this specific component.

// components.module.ts

import from '@angular/core';
import from '@ionic/angular';

import from './social-share/social-share.component';

const components = [
  SocialShareComponent
];

@NgModule({
  imports: [
    IonicModule
  ],
  declarations: components,
  exports: components
})
export class ComponentsModule { }

Using the component

Let’s open our home.page.html file and add the component.

// home.page.html

<ion-header [translucent]="true">
    <ion-toolbar>
        <ion-title>
            Components
        </ion-title>
    </ion-toolbar>
</ion-header>

<ion-content>
    <app-social-share currentPage="Home"></app-social-share>
</ion-content>

The element app-social-share is the one we have defined as the selector for our component in the social-share.component.ts file. Keep in mind that you can name the selector anything you want but you should stay away from keywords like button, div, etc. Now we only need to run the app and try it out.

> ionic serve

If you followed everything you should now see a blank screen. By opening up the developer console you will see the following message

ERROR Error: Uncaught (in promise): Error: Template parse errors:
'app-social-share' is not a known element:
1. If 'app-social-share' is an Angular component, then verify that it
is part of this module.
2. If 'app-social-share' is a Web Component then add
'CUSTOM_ELEMENTS_SCHEMA' to the '@NgModule.schemas' of this 
component to suppress this message. ("

<ion-content>
    [ERROR ->]<app-social-share></app-social-share>
</ion-content>
"): ng:///HomePageModule/HomePage.html@9:1
Error: Template parse errors:
'app-social-share' is not a known element:
1. If 'app-social-share' is an Angular component, then verify that 
it is part of this module.
2. If 'app-social-share' is a Web Component then add
'CUSTOM_ELEMENTS_SCHEMA' to the '@NgModule.schemas' of this 
component to suppress this message. ("

<ion-content>
    [ERROR ->]<app-social-share></app-social-share>
</ion-content>
"): ng:///HomePageModule/HomePage.html@9:1

We get this error message because we didn’t include the ComponentModule into our HomeModule and as a result the HomeComponent has no way of knowing how to render our app-social-share element.

Let’s fix this quickly by adding it.

@NgModule({
  imports: [
    ...
    ComponentsModule
  ],
  ...
})
export class HomePageModule {}

Rerunning the app now will display the button and clicking on the it will execute the click event handler with a simple share function.

final.gif

To end this blog post on a high note (and learn a little more) while still staying on the topic of self isolation and quarantines I thought it might be fun to learn about the origin of quarantines. Instead of me writting another post about it I’ll just drop a line from the CDC’s website.

The practice of quarantine, as we know it, began during the 14th century in an effort to protect coastal cities from plague epidemics. Ships arriving in Venice from infected ports were required to sit at anchor for 40 days before landing. This practice, called quarantine, was derived from the Italian words quaranta giorni which mean 40 days.
— Centers for Disease Control and Prevention

As always, you can check out the full code here.

Until next time,
stay healthy.

Using cents for money values

Ever since people mastered counting most of civilization has used a base 10 numbering system thanks to the number of fingers most people have.

The problem

It all good until you have to come up with representations of fractions. Our computers operate in binary so all numbers are represented as 2^x and unfortunately there are only a few fractions that can accurately be represented like that: 0, 0.25, 0.5, 0.75, and 1.

For all other numbers, there will be an error in their representation which usually isn’t a problem since those small amounts will just get rounded away but if you perform a lot of operations those small errors will add up.

Let’s look at just 2 small examples:

Let’s say you are selling an article for $1.10 and a customer wants to buy 12 of them.
A human would calculate this as 12 * $1.10 = $13.20 and would be done with it while a computer would give you 13.200000000000001.

Now that’s not nice! It isn’t terrible either because you can fix it with a simple rounding procedure.

The second example we can have a look at is the following. You have upgraded your manufacturing process and can sell them now for $0.83. Let’s just calculate how much you have saved your customers per article. $1.10 - $0.83 = $0.27. Nice! The computer however thinks that your savings are actually $0.27000000000000013.

This, again, is something we could live without.

Simple solution

Represent all of your money values as cents or minor values of your currency.

Selling 12 items of $1.10 items would be 12 * 110 = 1320 and a simple conversion would bring this back to $13.20. Since you are dealing with integer numbers the entire problem with floats goes away and you are safe from potential miscalculations.

Another benefit in using integers over floats is that they are in general faster for the computer to work with so if you are working on applications that do a lot of calculations, you might see an improvement in this department as well.

Until next time, happy coding

Adding timestamps to photos

While working on an Ionic project, the client asked for a timestamp to be added at the bottom of a taken photo.

After some head scratching, I ended up with the solution below.

onTakePhoto(): void {
  const options: CameraOptions = {
    quality: 30,
    destinationType: this.camera.DestinationType.DATA_URL,
    encodingType: this.camera.EncodingType.JPEG,
    mediaType: this.camera.MediaType.PICTURE,
    targetWidth: 2304,
    targetHeight: 1728
  };

  this.camera.getPicture(options).then(
    (imageData) => {
      this.generateImageWithTimestamp("data:image/jpeg;base64," + imageData);
    },
    (error) => {
      // not important now
    }
  );
}

generateImageWithTimestamp(dataUrl: string): void {
  let image = new Image();
  image.onload = () => {
    let canvas = document.createElement("canvas");
    let context = canvas.getContext("2d");

    canvas.height = image.height;
    canvas.width = image.width;

    context.drawImage(image, 0, 0);

    //adding some styling
    context.font = "80px Arial bold";
    context.textAlign = "center";
    context.fillStyle = "orange";
    context.fillText(
      this.getTimeStamp(),
      image.width / 2, //center
      image.height * 0.97 //close to the bottom
    );

    const finalImage = canvas.toDataURL("image/jpeg", 1);
  };
  image.src = dataUrl;
}

getTimeStamp(): string {
  const date = new Date();

  return `${date.getDate()}. ${date.getMonth() +1}. ${date.getFullYear()}, ${date.getHours()}:${date.getMinutes()}`;
}

We simply take a photo, redraw it on a canvas where we also add the timestamp.

One thing to keep in mind here is that order is important.

In my first attempt I first added the text and then the image which, of course, has overwritten the text. It looks obvious now but it took me a little to figure it out.

Hope this will help you out.

Until next time,
Happy coding.

Deciphering error messages in Ionic

While working on some projects which use the camera to take pictures inside the app I had to add a description for the user to ask for permission.

The code for that is pretty simple:

<edit-config file="*-Info.plist" mode="merge" target="NSPhotoLibraryUsageDescription">
   <string>Please let me take pictures</string>
</edit-config>

After that I wanted to build the application for iOS with the following command:

ionic cordova build ios

What usually finished after 10 seconds with a success message now ended like this:

Now that’s what I call an error message!

Now that’s what I call an error message!

If you are like me you would have no idea what this means. Trying to build again doesn’t solve the problem so it has to be something with this particular change.

After a little bit of digging around I found the fix.

Go into the platforms folder and into ios. There you will find ios.json which holds configurations for the entire application. Locate *-Info.plist and delete the entire object.

After that simply run:

ionic cordova prepare ios

Your build will work again and you can get on with finish your app.

Hope this helps.

Until next time,
happy coding.

Getting enum keys in TypeScript

They can be your friend..

They can be your friend..

While working on a task, my colleague stumbled upon a quirky problem.

He tried to fetch all keys out of an enum but ended up with both the keys and values. We tried figuring out why this happens and once we saw the compiled javascript everything was clear.

Let’s have a look:

enum SomeEnum { 
    A,
    B,
    C,
    D
}

The enum above will be transpiled into:

var SomeEnum;
(function (SomeEnum) {
    SomeEnum[SomeEnum["A"] = 0] = "A";
    SomeEnum[SomeEnum["B"] = 1] = "B";
    SomeEnum[SomeEnum["C"] = 2] = "C";
    SomeEnum[SomeEnum["D"] = 3] = "D";
})(SomeEnum || (SomeEnum = {}));

The thing here that is important is to realize that with this output the final object will have A, B, C, and D as keys as well as 0, 1, 2, and 3.

Because of the SomeEnum[“A”] = 0 assignment we will create a property “A” with the value of 0 and then (as part of the larger SomeEnum[SomeEnum["A"] = 0] = "A"; assignment) create a property “0” with the value of "A” .

If you try to get the keys (with Object.keys()) you will get the mentioned A, B, C, D, 0, 1, 2, and 3.

To get only they keys or member names you can do something like this:

let enums = Object.keys(SomeEnum).filter(x => !(parseInt(x) >= 0));
console.log("Enums", enums); //Enums: A, B, C, D

Hope this will help you out in your TypeScript quest.

Until next time.

Happy Coding!

Error when creating a new Ionic project - ZlibError

Now that Ionic 4(!!!) is out I wanted to take it for a ride. I opened up VS Code and entered the following command into the terminal

> ionic start ionic4test tabs

After a second or two the process stopped with the following error

- Downloading and extracting tabs starter (100.00%)
events.js:193
      throw er; // Unhandled 'error' event
      ^

ZlibError: zlib: Cannot read property 'length' of null
    at Unzip.Zlib.(anonymous function) (C:\Users\Ivan Karacic\AppData\Roaming\npm\node_modules\ionic\node_modules\minizlib\index.js:126:21)
    at Unzip.write (C:\Users\Ivan Karacic\AppData\Roaming\npm\node_modules\ionic\node_modules\minizlib\index.js:247:21)
    at Unzip.flush (C:\Users\Ivan Karacic\AppData\Roaming\npm\node_modules\ionic\node_modules\minizlib\index.js:206:10)
    at Unzip.end (C:\Users\Ivan Karacic\AppData\Roaming\npm\node_modules\ionic\node_modules\minizlib\index.js:213:10)
    at Unpack.end (C:\Users\Ivan Karacic\AppData\Roaming\npm\node_modules\ionic\node_modules\tar\lib\parse.js:416:21)
    at IncomingMessage.onend (_stream_readable.js:598:10)
    at Object.onceWrapper (events.js:322:30)
    at emitNone (events.js:120:20)
    at IncomingMessage.emit (events.js:218:7)
    at endReadableNT (_stream_readable.js:1054:12)

I first tried updating the minizlib Node module but that didn’t help.

After some random web searches I found out what the issue is.

A simple upgrade to a 10+ Node.js version did the trick.

It took me around 30 minutes to figure this one out so I hope that this might help you get to the answer a little quicker.

Until next time,
happy coding.

Passing data back from a child page (Ionic tips and tricks)

When working with Ionic (3), I came across the need to pass between pages.

Full steam ahead!

Here is what the Ionic docs have to say about it:

push(page, params, opts) 

//Push a new component onto the current navigation stack.
//Pass any aditional information along as an object.
//This additional information is accessible through NavParams

Let’s try it out!

export class StartPage {
    constructor(public navCtrl: NavController) {
    }

    pushPage(): void {
        this.navCtrl.push(OtherPage, {
          id: "123",
          name: "Carl"
        });
    }
}

class OtherPage {
    constructor(private navParams: NavParams) {
        let id = navParams.get('id');
        let name = navParams.get('name');
    }
}

As you can see above, it’s quite straight forward. You push a new component on the navigation stack and pass an object as your navigation parameter and then get those parameters in the child page.

Going back the other way

There might be situations where you want to pass data from your child page to the parent. The user might select something and you want this information in the parent to fill out a form for example.

That’s where things get a little tricky.

Here the documentation say:

pop(opts) 
//Call to navigate back from a current component.
//Similar to push(), you can also pass navigation options.

However, those navigation options don’t offer you all that much

Property   Value    Description
animate    boolean  Whether or not the transition should animate.
animation  string   What kind of animation should be used.
direction  string   The conceptual direction the user is navigating. For example, is the user navigating forward, or back?
duration   number   The length in milliseconds the animation should take.
easing     string   The easing for the animation.

We will have to come up with some other way of passing data back to the parent.

The bad

Two approaches I don’t like at all are: having a global object and having some kind of pub/sub mechanism.

When you maintain a global object which will keep informations for all pages to be read from things can get quite complicate. Once your application gets quite large this starts to look like a mess and having a single file grow to a few hundreds or even thousands of lines (I have worked once on a project that had a globalSettings object was a nightmare) is not really something to look up to.

Another approach is to have some kind of pub/sub functionality where one page would publish/broadcast something and then all other views would just pick it up update their state. I don’t really like this approach since you, again, rely on a single object to take care of everything.

The good

One solution I like quite a lot is the use of Promises. You pass the resolve callback as a parameter to the child view and once the view pops you execute the resolve callback and pass data to the parent.

Your code could look something like this:

export class StartPage {
    constructor(public navCtrl: NavController) {
    }

    pushPage(){
        new Promise((resolve, reject) => {
            this.navCtrl.push(OtherPage, {
                id: "123",
                name: "Carl",
                resolve: resolve
            });
        }).then((data) => {
          console.log(data); // 'some data'
        });
    }
}

class OtherPage {
    private resolve: Function;
    constructor(private navParams: NavParams) {
        let id = navParams.get('id');
        let name = navParams.get('name');
        resolve = navParams.get('resolve'); 
    }
    
    returnData(): void {
        this.navCtrl.pop().then(() => this.resolve('some data'))
    }   
}

This looks nice and there isn’t a lot of overhad involved but, unfortunately, couples your parent its child.

My favorite approach

One thing that bugs me about the above approach is the new Promise we have to create and then wire up to get it working. That’s why the next approach is by far my favorite:

export class StartPage {
    constructor(public navCtrl: NavController) {
    }

    pushPage(): void {
        this.navCtrl.push(OtherPage, {
          id: "123",
          name: "Carl",
          callback: this.handleChildPage
        });
    }
    
    handleChildPage(data): void {
        console.log(data); // 'some data'
    }
}

class OtherPage {
    private callback: Function;
    constructor(private navParams: NavParams) {
        let id = navParams.get('id');
        let name = navParams.get('name');
        callback = navParams.get('callback'); 
    }
    
    returnData(): void {
        this.callback('some data');
        this.navCtrl.pop();
    }   
}

It doesn’t look much different than the solution with promises but I like this one a little more because we have avoided two .then(…) statements which make the code look a little more cluttered than I like. But, just as the example above, this one also couples your two views and that’s something we will have to live with (for now).

The ideal solution

I am looking forward where we will be able to pass navParams into the pop function and then just pick them up in the parent and use them.

Let me know about your approaches in the comments below.

Until next time,

Happy coding

Showing image only when fully loaded (Angular 1)

While working for a client, a requirement came up requesting for images only to be visible when fully downloaded.

The reason for this is that currently the images would load line by line which doesn't look quite nice. 

I started playing around a little but nothing worked as I would have liked, so I had to go deeper.

inceptius-meme-generator-we-have-to-go-deeper-014848.jpg

Directives to the rescue!

I ended up creating a new directive and hooked it up in my markup.

//.js
angular.module('app', [])
.directive("dynamicImage", function () {
  return {
    restrict: 'E', //restrict only to elements
      scope: {
        imageSource: '=src' //hook up to the outside scope
      },
      template: '<img ng-show="showImage" src="{{ imageSource }}">',
      //get the element and bind to the load event
      link: function ($scope, iElm, iAttrs, controller) {
        $scope.showImage = false;
        iElm.find('img').bind('load', function (e) {
        //when loaded show the image            
        $scope.$apply('showImage = true');
       });
    }
  }
});

//.html
//keep in mind that you don't need interpolation here
//so pass only the property without the '{{}}'
<dynamic-image src="propertyHoldingTheImageSource"></dynamic-image>

If you try it out now you won't see the image until fully loaded. 

To enhance the user experience a little more you can add a background image to the parent <div> which can serve as a placeholder but this is a topic for another time :)

Until then, happy coding!