Ionic

Did a user click a button?

While working on a project I came across a situation where I needed to know if a button was clicked by a user or if it had been triggered by the code.

Lucky for us, the DOM is pretty friendly to us in this instance and offers us some help - the isTrusted property from the Event interface.

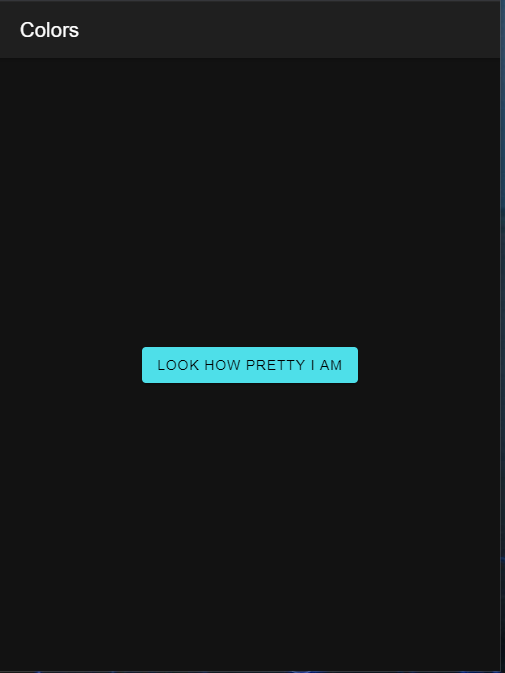
Let’s create a simple Ionic app and add in some HTML and Typescript to try it out.

<ion-content>
  <ion-item text-center>
    <ion-label class="ion-text-center">{{ source }}</ion-label>
  </ion-item>

  <br />

  <ion-button id="button" expand="block">
    User click click
  </ion-button>

  <ion-button (click)="onRobotClick()" expand="block">
    Robot click
  </ion-button>
</ion-content>

We have a simple label which will hold the source of our clicks and two buttons.

Let’s now add some typescript code to handle all the different clicks.

export class HomePage implements OnInit {
  source: string;
  constructor() {}
  
  ngOnInit(): void {
    document
      .getElementById('button')
      .addEventListener('click', (event: Event) => {
        this.setSource(event.isTrusted)
      })
  }

  onRobotClick() {
    document.getElementById('button').click();
  }

  setSource(isTrusted: boolean) {
    this.source = isTrusted ? 'User' : 'Robot'
  }
}

We will add an eventListener on our first button and then monitor what happens with him.

Clicking the button itself will trigger a regular event which we will handle with the event listener and check for the isTrusted property which should be set to true.

If we click the second button we will executed a different function which will grab the element by its id and execute a click which should result in the isTrusted being set to false.

In both cases we will call the setSource function which will get the property and display if a user or robot clicked on the button.

click-gif.gif

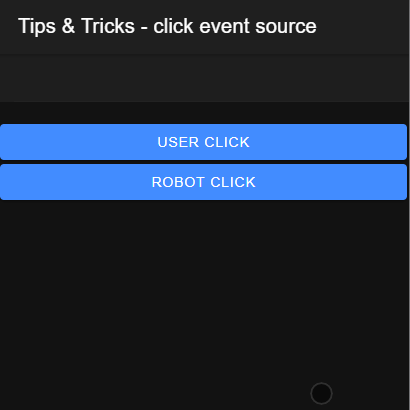
As you can see above, clicking the button directly results in the isTrusted property being true so the app displays, correctly, that a user clicked on the button. Clicking the other button triggers a programmatical click on the HTML element which results in the property being false which is indicated by the label changing to Robot.

As always, you can get the code from github.

That’s it for today.

Until next time,
Happy coding

Adding custom colors to your Ionic app

I would have thought that a global pandemic would slow things down for me but I had more work to do than ever which is a nice problem to have I guess :)
Writing blog posts had to go on a brief pause but after a quick two week break I am ready to try to get you excited about the ease of use in Ionic.
Since it’s quite hot in the northern hemisphere, the next few posts are all going to be light and won’t require a lot of brain power to process ;)

The problem

Ionic comes with a few built in colors but every now and then you run into the issue that you need to add one special color to make your app shine again. You can either change one of the predefined ones, especially if it’s a color that defines your app, or you can create a whole new color and use it later.

Changing one of the built in colors is easy as you just have to go into the theme folder and fiddle around with one of them. However, there is a limited number of candidates for that. Yo can pretty much only change primary, secondary, and tertiary because the remaining colors (success, warning, danger, dark, medium, and light) already have a pretty strict semantic meaning and adding a green hue to a warning color, for example, can lead to potential issues down the road.

Let’s check out how to solve this in a more elegant way.

The solution

The easiest way you can get a full color definition is to go to the Ionic colors documentation and define your new color.

I have given my color the name Crojach and selected a nice shade of light blue (I am partially color blind so give me a break here :)

Once you select the color you want, you will see some auto generated scss code below similar to this

:root {
  --ion-color-crojach: #4edfe9;
  --ion-color-crojach-rgb: 78,223,233;
  --ion-color-crojach-contrast: #000000;
  --ion-color-crojach-contrast-rgb: 0,0,0;
  --ion-color-crojach-shade: #45c4cd;
  --ion-color-crojach-tint: #60e2eb;
}

.ion-color-crojach {
  --ion-color-base: var(--ion-color-crojach);
  --ion-color-base-rgb: var(--ion-color-crojach-rgb);
  --ion-color-contrast: var(--ion-color-crojach-contrast);
  --ion-color-contrast-rgb: var(--ion-color-crojach-contrast-rgb);
  --ion-color-shade: var(--ion-color-crojach-shade);
  --ion-color-tint: var(--ion-color-crojach-tint);
}

It’s important to stick everything generated into your code, otherwise it won’t work.

The first part is just a new color definition. It defines the HEX and RGB colors as well as the contrast colors, shades and tints. It’s the same as you would see it for the predefined colors that come with Ionic.

The second, selector, definition is what your color gets translated into by Ionic. Once you set a {Color} to your element, Ionic will add an ion-color-{Color} to that element. It will then check out your css files and apply the required color.

Colors in action

Let’s put it all together now. You can add the color definition anywhere you want. Just make sure it’s referenced.

I have created a new file theme/colors.scss and added the above auto generated code into it.

We then import this file into the global.scss file and are ready to use it in our app.

// theme/colors.scss

:root {
  --ion-color-crojach: #4edfe9;
  --ion-color-crojach-rgb: 78,223,233;
  --ion-color-crojach-contrast: #000000;
  --ion-color-crojach-contrast-rgb: 0,0,0;
  --ion-color-crojach-shade: #45c4cd;
  --ion-color-crojach-tint: #60e2eb;
}

.ion-color-crojach {
  --ion-color-base: var(--ion-color-crojach);
  --ion-color-base-rgb: var(--ion-color-crojach-rgb);
  --ion-color-contrast: var(--ion-color-crojach-contrast);
  --ion-color-contrast-rgb: var(--ion-color-crojach-contrast-rgb);
  --ion-color-shade: var(--ion-color-crojach-shade);
  --ion-color-tint: var(--ion-color-crojach-tint);
}

// global.scss

...
@import "./theme/colors.scss"

// home.page.html
<ion-header>
    <ion-toolbar>
        <ion-title>
            Colors
        </ion-title>
    </ion-toolbar>
</ion-header>
<ion-content>
    <div id="container">
        <ion-button color="crojach">
            Look how pretty I am
        </ion-button>
    </div>
</ion-content>

Once you run the app you will see something like this

Button.png

It’s not the prettiest button (whatever the label says) but it’s a quick and easy way to generate more variety in your app.

Just keep in mind no to go overboard with the number of colors :)

As always, the full code is on Github.

Until next time,
Happy coding

Ionic 4 - ion-skeleton-text

Over the years, a lot has been said about bounce rate. In essence, you want as many people as possible to stay on your app/page for as long as possible.

One tactic you really should employ is to create something that is engaging for your users. The more they like your content, the more likely is it they will keep coming back - and stay longer.

One problem with that is the more people you compel to give you their time, the harder it becomes for your system to handle all that traffic.

You start improving your system to stay under some magical threshold of 3 seconds and all is looking good. Your app loads fast, doesn’t crash and overall performs as you want it to.

But there is always something extra you can do to can do to shorten the time from app start to app use for your user even if it’s just perceived as being shorter.

Let there be code

Let’s create a blank Ionic project and check a cool new feature in Ionic 4 - ion-skeleton-text.

> ionic start ion-skeleton-text blank

Let’s now go into the home.page.html file and add the content

<!-- home.page.html -->
<ion-content>
  <ion-list>
    <ion-item *ngFor="let item of items">
      {{ item }}
    </ion-item>
  </ion-list>
</ion-content>

We also need some content which we will display with some delay.

// home.page.ts
export class HomePage implements OnInit {
  items: Array<string>;
  constructor() {}

  ngOnInit(): void {
    setTimeout(() => {
      this.items = [
        'Berlin',
        'Buenos Aires',
        'Madrid',
        'New York',
        'Paris',
        'Sydney',
        'Tokyo'
      ];
    }, 2500);
  }
}

If you now execute

> ionic serve

you will see something like this

No loading indication

No loading indication

Adding a loading screen

In order to let the user know that something is going on in the background, we could add a loading indicator which we would remove once the data has been loaded.

// home.page.html
export class HomePage implements OnInit {
  items: Array<string>;
  constructor(private loadingController: LoadingController) {}

  ngOnInit(): void {
    this.loadData();
  }

  async loadData(): Promise<void> {
    const loading = await this.loadingController.create({
      message: 'Loading cities...'
    });

    await loading.present();

    setTimeout(() => {
      this.items = [
        'Berlin',
        'Buenos Aires',
        'Madrid',
        'New York',
        'Paris',
        'Sydney',
        'Tokyo'
      ];

      loading.dismiss();
    }, 2500);
  }
}

I won’t go into the fact that displaying a loading screen should be handled separately because that’s not the point of this post but I know you would never push code like this ;)

Now if we save and check out our browser again we will see a nice loading screen.

Loading screen

Loading screen

Let’s make it a little better

One thing that we know about loading screens is that we don’t really like them. Loading screens on games, apps or anywhere else is something that starts to annoy us quite quickly so we have to keep them as short as possible or remove them completely.

We can try to trick people into believing that the app is already in the process of displaying some content when in fact it’s still waiting for the server to respond. In some cases, it’s just enough to let your users feel like the app is working to make them happy.

When you are courting a nice girl an hour seems like a second. When you sit on a red-hot cinder a second seems like an hour. That’s relativity
— Albert Einstein

If we can display to the user something to keep them happy until they get what they came for we can keep them engaged for longer.

ion-skeleton-text is the answer

ion-skeleton-text is a new UI component which displays a placeholder content instead of the true one.

Implementing it is very straight-forward as you will see soon. Let’s dive right into it.

<!-- home.page.html -->
<ion-content>
  <ion-list *ngIf="items; else skeleton">
    <ion-item *ngFor="let item of items">
      {{ item }}
    </ion-item>
  </ion-list>
</ion-content>

<ng-template #skeleton>
  <ion-list>
    <ion-item *ngFor="let item of [50, 20, 70, 80, 50]">
      <p [ngStyle]="{ width: item + '%' }">
        <ion-skeleton-text animated></ion-skeleton-text>
      </p>
    </ion-item>
  </ion-list>
</ng-template>

What we do here is to simply show the items once they are set (after the 2500 ms) while displaying a few placeholder items in the mean-time.

We also got rid of the loading screen code again in the home.page.ts file to make it look like it was before.

// home.page.ts
export class HomePage implements OnInit {
  items: Array<string>;
  constructor() {}

  ngOnInit(): void {
    this.loadData();
  }

  async loadData(): Promise<void> {
    setTimeout(() => {
      this.items = [
        'Berlin',
        'Buenos Aires',
        'Madrid',
        'New York',
        'Paris',
        'Sydney',
        'Tokyo'
      ];
    }, 2500);
  }
}

Now if you save all you will see something like this:

Skeleton text

Skeleton text

This looks a lot more dynamic than having just a simple spinner and loading message. If you are displaying complex data you can even take advantage of two other cool Ionic component - ion-avatar and ion-thumbnail.

Let’s create one final skeleton-text item which will represent some more complex data.

<!-- home.page.html -->
<ion-content>
  <ion-list *ngIf="items; else skeleton">
    <ion-item *ngFor="let item of items">
      <ion-thumbnail slot="start">
        <img [src]="item.image" />
      </ion-thumbnail>
      <ion-label>
        <h3>City: {{ item.city }}</h3>
        <p>Country: {{ item.country }}</p>
        <p>Population: {{ item.population }}</p>
      </ion-label>
    </ion-item>
  </ion-list>
</ion-content>

<ng-template #skeleton>
  <ion-list>
    <ion-item *ngFor="let item of [1, 2, 3, 4, 5]">
      <ion-thumbnail slot="start">
        <ion-skeleton-text animated></ion-skeleton-text>
      </ion-thumbnail>
      <ion-label>
        <h3>
          <ion-skeleton-text animated style="width: 50%"></ion-skeleton-text>
        </h3>
        <p>
          <ion-skeleton-text animated style="width: 80%"></ion-skeleton-text>
        </p>
        <p>
          <ion-skeleton-text animated style="width: 60%"></ion-skeleton-text>
        </p>
      </ion-label>
    </ion-item>
  </ion-list>
</ng-template>

The typescript code has change also a little:

export class HomePage implements OnInit {
  items: Array<any>;
  constructor() {}

  ngOnInit(): void {
    this.loadData();
  }

  async loadData(): Promise<void> {
    setTimeout(() => {
      this.items = [
        { city: 'Berlin', country: 'Germany', population: '3.5 million', image: '...' },
        { city: 'Buenos Aires', country: 'Argentina', population: '15 million', image: '...' },
        { city: 'Madrid', country: 'Spain', population: '3.3 million', image: '...' },
        { city: 'New York', country: 'USA', population: '19.5 million', image: '...' },
        { city: 'Paris', country: 'France', population: '2.2 million', image: '...' },
        { city: 'Sydney', country: 'Australia', population: '5.4 million', image: '...' },
        { city: 'Tokyo', country: 'Japan', population: '9.2 million', image: '...' }
      ];
    }, 2500);
  }
}

The final result looks now like this:

A more complex example

A more complex example

Now that’s pretty, isn’t it?

The ion-skeleton-text UI component can add a little twist to your app and give the user something shiny to look at while your app does all the heavy lifting. It will keep them focused on something until the final content loads fully and you are able to display it. Giving the user the feeling that the app is running instead of waiting will make them come back and will give you more users to serve.

If you want to check out the code, have a look at it here.

Until next time,
happy coding.

Simple multi level menu in Ionic/Angular

While working on a project, a new requirement emerged where the client wanted to have a multi level menu displayed. After some digging around I didn’t find anything that was simple enough. Pretty much all of them were using some kind of id + level tags on menu items which then helped them know if they should expand something or not.

I like to keep things as simple as possible so I tried to take advantage of Angular’s component system and build something a little easier to understand.

Hello world (kind of)

Let’s first create an Ionic app with a predefined side menu and move from there. You just need to run this command in your terminal and Ionic will do the rest.

> ionic start multilevel-menu sidemenu

Now you can start your app with the following command

> ionic serve

This will start your (default) browser and you should see something like this:

What we start with

What we start with

Looks nice, but nothing too exciting.

1. Housekeeping

Before we start, let’s remove a bunch of things before we start. Let’s remove everything referencing list. Remove the entire list folder as well as all of it’s traces from the app.components.ts and app-routing.module.ts files. If you rerun ionic serve now, you will see just a single home menu item.

2. Creating a model

What better thing to have as a model for our multi level menu than a restaurant menu. Unfortunately, restaurant menus can get quite complicated but it will serve our needs perfectly.

We will create a very simple model with just three properties: name, id, and children. Create a new folder inside the app folder and name it models. Add another file, named menu-item.ts into it.

//src/app/models/menu-item.ts

export class MenuItem {
  name: string;
  id: number;
  children: Array<MenuItem>;
}

3. Creating some data

Based on this model, let’s creating some data for our app to use. We will create another folder named data inside the assets folder and add a new menu-items.ts file into it with the following content

//src/assets/data/menu-items.ts

export const menuItems = [
  {
    name: 'Appetizers',
    id: 1,
    children: [
      {
        name: 'Fresco Salsa',
        id: 6,
        children: null
      }
    ]
  },
  {
    name: 'Main dishes',
    id: 2,
    children: [
      {
        name: 'Beef',
        id: 7,
        children: [
          {
            name: 'Crispy Orange Beef',
            id: 10,
            children: null
          }
        ]
      },
      {
        name: 'Burger',
        id: 8,
        children: [
          {
            name: 'Chorizo Burger',
            id: 11,
            children: null
          }
        ]
      },
      {
        name: 'Vegetarian',
        id: 9,
        children: [
          {
            name: 'Chile Rellenos',
            id: 12,
            children: null
          }
        ]
      }
    ]
  },
  {
    name: 'Side dishes',
    id: 3,
    children: [
      {
        name: 'Baked potato',
        id: 13,
        children: null
      }
    ]
  },
  {
    name: 'Salads',
    id: 4,
    children: [
      {
        name: 'Taco Slaw',
        id: 14,
        children: null
      }
    ]
  },
  {
    name: 'Desserts',
    id: 5,
    children: [
      {
        name: 'Crepes',
        id: 15,
        children: null
      }
    ]
  }
];

It’s a mix of everything, so I hope there is something for you in this menu as well!

4. Final work before the good stuff

The last thing we have to do is go back to our app.component.ts and replace appPages with our new menuItems

//src/app/app.component.ts

import { menuItems } from '../assets/data/menu-items';

// ...

export class AppComponent {
  private menu = menuItems;
  // ...
}

The last thing we have to do is to remove the old markup used to render the menu and replace it with something simpler (for now). Let’s go into the app.component.html file and do that right now.

<!--src/app/app.component.html-->

<ion-menu-toggle auto-hide="false" *ngFor="let menuItem of menu">
  <ion-item>
    {{menuItem.name}}
  </ion-item>
</ion-menu-toggle>

Saving everything you should see your new menu in all it’s glory.

The first level of menu items

The first level of menu items

It’s pretty, isn’t it?

5. Brainstorming

Let’s think about how we are going to proceed here. From the model we can see that we have a menu item that can hold a bunch of menu items and so on.

What we will do then is to create a component which will pass its children to another component of the same type.

If the current component doesn’t have any children it’s a dish and we will display a simple button for the user to tap on, otherwise it’s just a category and we will display it differently.

6. Creating the component

If you are like me you don’t know all the bits and pieces a component needs right away. Lucky for us Ionic and Angular have us covered. Just switch to your terminal and type in the following command

> ionic g c menu-item

This will tell the Ionic (and underlying Angular) CLI to g(enerate) a new c(omponent) named menu-item.

We, also, need to let Ionic know about our new component so we will add it into the declarations array of the app.module.ts file.

//src/app/app.module.ts

import { MenuItemComponent } from './menu-item/menu-item.component';

// ...

@NgModule({
  declarations: [AppComponent, MenuItemComponent],
  
  /// ...
}

Let’s change the markup in app.component.html file to use the new component:

<!--src/app/app.component.html-->

 <ion-menu-toggle auto-hide="false" *ngFor="let menuItem of menu">
   <!-- <ion-item>
     {{menuItem.name}}
   </ion-item> -->
   <app-menu-item></app-menu-item>
 </ion-menu-toggle>

Saving it all now will result in this:

Looks like my CS degree is paying off

Looks like my CS degree is paying off

There is one last step until we can call it a day…

7. Finishing the component

As we discussed above, if the current menu item has children, we want it to display its name and pass its children down to another component of the same type. If there are no children, display a button which the user can click.

The final component will look something like this:

<!--src/app/menu-item/menu-item.component.html-->

<div>
  <p *ngIf="menuItem.children; else finalItem">
    <ion-button
      [color]="isRoot ? 'primary' : 'secondary'"
      [expand]="isRoot ? 'full' : 'block'"
      (click)="isOpen = !isOpen"
    >
      {{ menuItem.name }}
    </ion-button>

    <span *ngIf="isOpen">
      <app-menu-item
        *ngFor="let item of menuItem.children"
        [menuItem]="item"
      ></app-menu-item>
    </span>
  </p>
</div>

<ng-template #finalItem>
  <p>
    <ion-button color="light" expand="full" 
                (click)="onMenuItemSelected(menuItem)">
      {{ menuItem.name }}
    </ion-button>
  </p>
</ng-template>

The trick here is simply to toggle each component’s isOpen property and toggle between showing and hiding the children. Also, if you aren’t familiar with the if - else syntax from here, check out one of my previous posts.

Let’s just clean up the app.component.html a little and we are done

<!--src/app/app.component.html-->

<app-menu-item
  *ngFor="let menuItem of menu"
  [menuItem]="menuItem"
  [isRoot]="true">
</app-menu-item>

The final product will look like this:

Final multile level menu

Final multile level menu


If you had trouble following along, or just want to see the code fully. You can check it out here.

Until next time,
happy coding.

Adding timestamps to photos

While working on an Ionic project, the client asked for a timestamp to be added at the bottom of a taken photo.

After some head scratching, I ended up with the solution below.

onTakePhoto(): void {
  const options: CameraOptions = {
    quality: 30,
    destinationType: this.camera.DestinationType.DATA_URL,
    encodingType: this.camera.EncodingType.JPEG,
    mediaType: this.camera.MediaType.PICTURE,
    targetWidth: 2304,
    targetHeight: 1728
  };

  this.camera.getPicture(options).then(
    (imageData) => {
      this.generateImageWithTimestamp("data:image/jpeg;base64," + imageData);
    },
    (error) => {
      // not important now
    }
  );
}

generateImageWithTimestamp(dataUrl: string): void {
  let image = new Image();
  image.onload = () => {
    let canvas = document.createElement("canvas");
    let context = canvas.getContext("2d");

    canvas.height = image.height;
    canvas.width = image.width;

    context.drawImage(image, 0, 0);

    //adding some styling
    context.font = "80px Arial bold";
    context.textAlign = "center";
    context.fillStyle = "orange";
    context.fillText(
      this.getTimeStamp(),
      image.width / 2, //center
      image.height * 0.97 //close to the bottom
    );

    const finalImage = canvas.toDataURL("image/jpeg", 1);
  };
  image.src = dataUrl;
}

getTimeStamp(): string {
  const date = new Date();

  return `${date.getDate()}. ${date.getMonth() +1}. ${date.getFullYear()}, ${date.getHours()}:${date.getMinutes()}`;
}

We simply take a photo, redraw it on a canvas where we also add the timestamp.

One thing to keep in mind here is that order is important.

In my first attempt I first added the text and then the image which, of course, has overwritten the text. It looks obvious now but it took me a little to figure it out.

Hope this will help you out.

Until next time,
Happy coding.

Deciphering error messages in Ionic

While working on some projects which use the camera to take pictures inside the app I had to add a description for the user to ask for permission.

The code for that is pretty simple:

<edit-config file="*-Info.plist" mode="merge" target="NSPhotoLibraryUsageDescription">
   <string>Please let me take pictures</string>
</edit-config>

After that I wanted to build the application for iOS with the following command:

ionic cordova build ios

What usually finished after 10 seconds with a success message now ended like this:

Now that’s what I call an error message!

Now that’s what I call an error message!

If you are like me you would have no idea what this means. Trying to build again doesn’t solve the problem so it has to be something with this particular change.

After a little bit of digging around I found the fix.

Go into the platforms folder and into ios. There you will find ios.json which holds configurations for the entire application. Locate *-Info.plist and delete the entire object.

After that simply run:

ionic cordova prepare ios

Your build will work again and you can get on with finish your app.

Hope this helps.

Until next time,
happy coding.

Passing data back from a child page (Ionic tips and tricks)

When working with Ionic (3), I came across the need to pass between pages.

Full steam ahead!

Here is what the Ionic docs have to say about it:

push(page, params, opts) 

//Push a new component onto the current navigation stack.
//Pass any aditional information along as an object.
//This additional information is accessible through NavParams

Let’s try it out!

export class StartPage {
    constructor(public navCtrl: NavController) {
    }

    pushPage(): void {
        this.navCtrl.push(OtherPage, {
          id: "123",
          name: "Carl"
        });
    }
}

class OtherPage {
    constructor(private navParams: NavParams) {
        let id = navParams.get('id');
        let name = navParams.get('name');
    }
}

As you can see above, it’s quite straight forward. You push a new component on the navigation stack and pass an object as your navigation parameter and then get those parameters in the child page.

Going back the other way

There might be situations where you want to pass data from your child page to the parent. The user might select something and you want this information in the parent to fill out a form for example.

That’s where things get a little tricky.

Here the documentation say:

pop(opts) 
//Call to navigate back from a current component.
//Similar to push(), you can also pass navigation options.

However, those navigation options don’t offer you all that much

Property   Value    Description
animate    boolean  Whether or not the transition should animate.
animation  string   What kind of animation should be used.
direction  string   The conceptual direction the user is navigating. For example, is the user navigating forward, or back?
duration   number   The length in milliseconds the animation should take.
easing     string   The easing for the animation.

We will have to come up with some other way of passing data back to the parent.

The bad

Two approaches I don’t like at all are: having a global object and having some kind of pub/sub mechanism.

When you maintain a global object which will keep informations for all pages to be read from things can get quite complicate. Once your application gets quite large this starts to look like a mess and having a single file grow to a few hundreds or even thousands of lines (I have worked once on a project that had a globalSettings object was a nightmare) is not really something to look up to.

Another approach is to have some kind of pub/sub functionality where one page would publish/broadcast something and then all other views would just pick it up update their state. I don’t really like this approach since you, again, rely on a single object to take care of everything.

The good

One solution I like quite a lot is the use of Promises. You pass the resolve callback as a parameter to the child view and once the view pops you execute the resolve callback and pass data to the parent.

Your code could look something like this:

export class StartPage {
    constructor(public navCtrl: NavController) {
    }

    pushPage(){
        new Promise((resolve, reject) => {
            this.navCtrl.push(OtherPage, {
                id: "123",
                name: "Carl",
                resolve: resolve
            });
        }).then((data) => {
          console.log(data); // 'some data'
        });
    }
}

class OtherPage {
    private resolve: Function;
    constructor(private navParams: NavParams) {
        let id = navParams.get('id');
        let name = navParams.get('name');
        resolve = navParams.get('resolve'); 
    }
    
    returnData(): void {
        this.navCtrl.pop().then(() => this.resolve('some data'))
    }   
}

This looks nice and there isn’t a lot of overhad involved but, unfortunately, couples your parent its child.

My favorite approach

One thing that bugs me about the above approach is the new Promise we have to create and then wire up to get it working. That’s why the next approach is by far my favorite:

export class StartPage {
    constructor(public navCtrl: NavController) {
    }

    pushPage(): void {
        this.navCtrl.push(OtherPage, {
          id: "123",
          name: "Carl",
          callback: this.handleChildPage
        });
    }
    
    handleChildPage(data): void {
        console.log(data); // 'some data'
    }
}

class OtherPage {
    private callback: Function;
    constructor(private navParams: NavParams) {
        let id = navParams.get('id');
        let name = navParams.get('name');
        callback = navParams.get('callback'); 
    }
    
    returnData(): void {
        this.callback('some data');
        this.navCtrl.pop();
    }   
}

It doesn’t look much different than the solution with promises but I like this one a little more because we have avoided two .then(…) statements which make the code look a little more cluttered than I like. But, just as the example above, this one also couples your two views and that’s something we will have to live with (for now).

The ideal solution

I am looking forward where we will be able to pass navParams into the pop function and then just pick them up in the parent and use them.

Let me know about your approaches in the comments below.

Until next time,

Happy coding